| Module #2, Assignment #2
Exercise #1
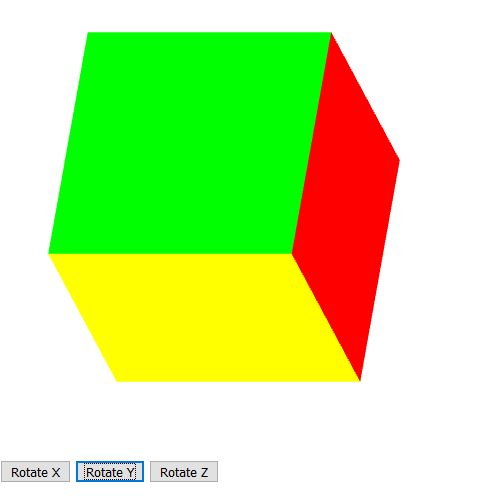
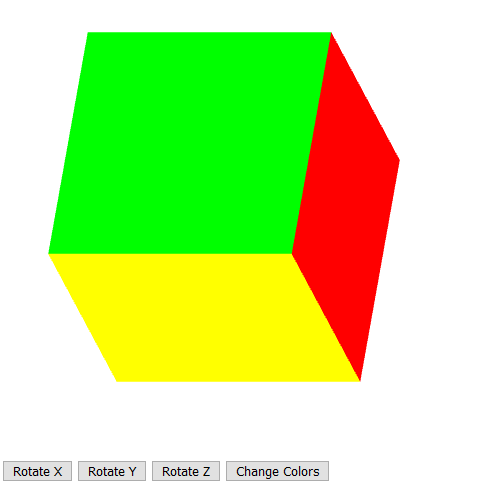
Make a program called Spinning6ColorCube that rotates a cube, that has a different solid color on each of it six faces using the gl.ELEMENT_ARRAY_BUFFER type of buffer as an index buffer called iBuffer.
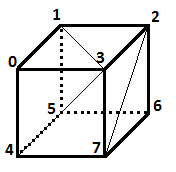
The current version of this program has colors that blend on each face like so:
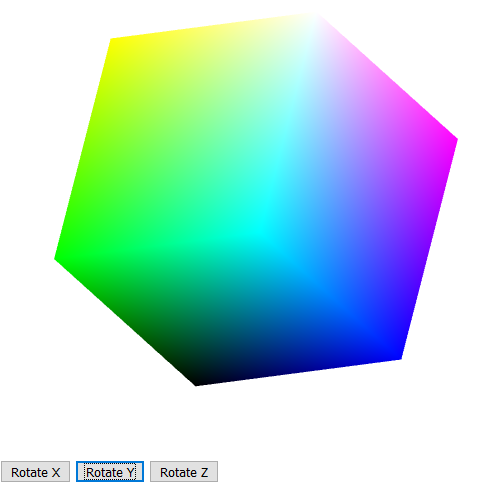
What you need to do is find the right collection of vertices to produce six solid colors on six faces.
The HTML code for your program is given here: SpinningCube.html. This code is complete and you will not need to modify it.
The partial Javascript code is given here: SpinningCube.js.
This code is incomplete and you will need to modify it in the following ways:
- You will need to create a vBuffer object, initialize it, and associate it with the associated vPosition attribute variable in the vertex shader.
- You will need to create a cBuffer object, initialize it, and associate it with the associated vColor attribute variable in the vertex shader. (Note that the vertexColors are vec4 values instead of vec3 values this time. In the 3DSierpinskiTriangleSpin program they were vec3 values.)
- You will need to create the thetaLoc uniform location object, associating it with the theta value. (Note that the "theta" variable is a vec3 value this time. That is because it holds three rotation angles, one for the x-axis, one for the y-axis and one for the z-axis.)
- You will need to create the three button handlers. Each button handler will just set which of the three theta values is the current one being rotated. This should be done by setting the global "axis" variable to one of three values: xAxis, yAxis or zAxis, which are equal to 0, 1, and 2 respectively.
- You will need to add the code for the render() function. The code should do the following:
- First you need to clear the color buffer bit AND the depth buffer bit.
- Then you need to modify the theta value for the axis currently being rotated. The theta values are in degree coordinates, so add a value like 2.0 to the angle to make it do one full rotation in about every 3 seconds.
- Then you need to update the thetaLoc association with a gl.uniform call.
- Then you draw the "indices" elements. Note that you will not be calling the "gl.drawArray()" function to draw the buffered array directly. Instead you will be calling the "gl.drawElements()" function to draw the buffer points in the order they are defined in the "indices" array.
This approach is being used because there are only 8 vertex points in the vBuffer array, defining the eight corners of the cube. But drawing those 8 points as triangles will not produce a cube image. To create the cube image, the indices array is arranged into 36 points (each references one of the 8 vertices by its index of 0-7). Every 3 of these points makes a triangle, which makes 12 triangles => 2 triangles per cube face on 6 cube faces. And this is what produces the cube object from the 8 vertices.
So instead of using the following call:
gl.drawArrays(gl.TRIANGLES, 0, vertices.length);
You need to draw the vertices in the order defined by the indices with the following call
gl.drawElements(gl.TRIANGLES, indices.length, gl.UNSIGNED_BYTE, 0);
- Finally, you need to call "requestAnimFrame(render);" to recursively call the render() function through the requestAnimFrame() function which will then smoothly update the animation.
- After completing these modifications you should be able to see your cube, but it still will not have all the sides showing the right colors yet. For that, you need to complete the final steps listed below. But first you need to better understand how the cube vertices are being used to make the program work.
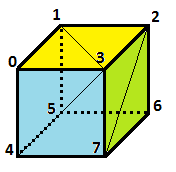
To understand how the program works now you need to understand that there are 8 vertices on the cube that are being indexed with numbers going from 0 to 7:
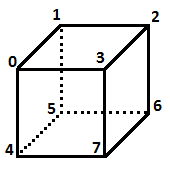
The 8 vertices are stored in the vBuffer, and the iBuffer stores sets of 3 indices to make triangles with each of those 3 indices. On each face of the cube, 2 triangles are made, so on the top face, the indices for one triangle are (1,0,3) and the indices for the other triangle are (3,2,1):
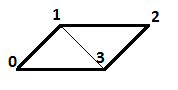
On the face on the right the two triangles are made up of the indices (2,3,7) and (7,6,2). And on the face in the front the indices are (3,0,4) and (4,7,3).
The problem is that each of these cube faces share vertices with the other cube faces. So drawing separate solid colors for these three faces won't work since the color at the vertice 0 will blend with yellow and blue and whatever is on the left side, and the color at vertice 3 will blend with yellow, blue and green, and this same problem will happen with each of the vertices.
One way to fix this is to have a separate set of vertices for each set of opposite facing sides. Let's say the first set of vertices is (0,1,2,3,4,5,6,7), and the next set is (0',1',2',3',4',5',6',7') and the last set is (0",1",2",3",4",5",6",7"). That means if we had three times as many vertices, then each face can have its own separate set of vertices like so:
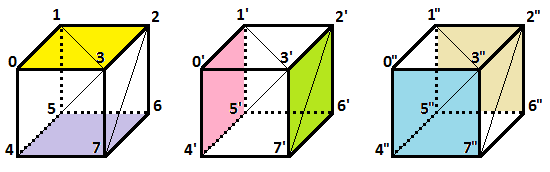
All the vertices will be in the same buffer, so (0,1,2,3,4,5,6,7) are for vertices 0 to 7 in the buffer, and (0',1',2',3',4',5',6',7') are for vertices 8 to 15 in the buffer, and (0",1",2",3",4",5",6",7") are for verticies 16 to 23.
This is three times as many vertices as you start with.
In order to create 3 times as many vertices, all you need to do is copy the 8 coordinates in the vertices array and paste it at the end twice. Right now it has the following coordinates:
var vertices = [
    vec3(-0.5, -0.5, 0.5),
    vec3(-0.5, 0.5, 0.5),
    vec3(0.5, 0.5, 0.5),
    vec3(0.5, -0.5, 0.5),
    vec3(-0.5, -0.5, -0.5),
    vec3(-0.5, 0.5, -0.5),
    vec3(0.5, 0.5, -0.5),
    vec3(0.5, -0.5, -0.5)
];
Step #1
The first thing you need to do is take those 8 lines, and copy them and paste them after the last line, and then do that again so that you have 24 lines instead of 8.
Step #2
Next, modify your indices array so that it uses coordinates from 0 to 23 instead of just 0 to 7. Right now, the indices array has the following values:
var indices = [
    1, 0, 3,
    3, 2, 1,
    2, 3, 7,
    7, 6, 2,
    3, 0, 4,
    4, 7, 3,
    6, 2, 1,
    1, 5, 6,
    4, 5, 6,
    6, 7, 4,
    5, 4, 0,
    0, 1, 5
];
These sets (lines) of 3 values will now only work for the top and the bottom face of the cube because those are the faces that use the values from 0 to 7. For the indices array, every two lines represent vertices for two triangles that cover one of the faces of the cube. So you need to modify these indices accordingly so that every opposite face uses a separate set of those vertices like so:
- The top face is covered by the triangles on the first two lines, so those two lines should remain unchanged.
The bottom face, which is opposite the top face, is covered by lines 9 and 10, and those should remain unchanged also. Just to be clear, those are the indices (4,5,6) and (6,7,4).
- The right face is covered by lines 3 and 4. So each of those vertices need to be part of the 2nd set of points in the vertices array. Each set has 8 points, so to get the indices on lines 3 and 4 to be the right ones, just add 8 to all the values on lines 3 and 4. By adding 8 you just shift those indices to the next set of values.
The opposite of the right face is covered by the last two lines, lines 11 and 12. So just add 8 to all the values on lines 11 and 12, because again, by adding 8 you just shift those indices to the next set of values.
- The front face is covered by lines 5 and 6. So each of those vertices need to be part of the 3rd set of points in the vertices array. Each set has 8 points, so to get the indices on lines 5 and 6 to be the right ones, just add 16 to all the values on lines 5 and 6. By adding 16 you just shift those indices to the last set of values.
The back face is covered by lines 7 and 8. So just add 16 to all the values on lines 7 and 8 because, again, by adding 16 you just shift those indices to the last set of values.
Step #3
You are now almost done. You just have to identify the colors that go with each vertice. This is done in the vertexColors array. There are 24 vertices now, so you should also have 24 values in the vertexColors array. Right now the values in the vertexColors array are as follows:
var vertexColors = [
    vec4( 0.0, 0.0, 0.0, 1.0 ),  // black
    vec4( 1.0, 0.0, 0.0, 1.0 ),  // red
    vec4( 1.0, 1.0, 0.0, 1.0 ),  // yellow
    vec4( 0.0, 1.0, 0.0, 1.0 ),  // green
    vec4( 0.0, 0.0, 1.0, 1.0 ),  // blue
    vec4( 1.0, 0.0, 1.0, 1.0 ),  // magenta
    vec4( 1.0, 1.0, 1.0, 1.0 ),  // white
    vec4( 0.0, 1.0, 1.0, 1.0 )   // cyan
];
That only covers 8 vertices, not 24. So you need to add another 16 vec4() values, and you also need to rearrange them. Why rearrange them? Because now the first 4 vertices covers the top face, and the next 4 covers the bottom face. This means the first 4 colors should all be the same color, and the next 4 colors should all be the same color (but different from the first 4).
Unfortunately, it gets a little complicated after that. The 3rd face with a solid color is the right face, but it is represented by the coordinates at (2',3',6',7'). That is not the same as being at (0',1',2',3') so the 3rd face is not the 3rd set of 4 color values. Instead you need to figure out where each of the indices (2',3',6',7') is in the set of 24 lines and you need to make all those the same color.
The 4th set of indices with a solid color is (0',1',4',5').
The 5th set of indices with a solid color is (0",3",4",7").
The 6th and final set of indices with a solid color is (1",2",5",6").
That's it. When you have gotten each of the 6 sets of vertices with a separate color, you should be all done. There will be 6 separate colors still, but each color will show up 4 times for the 4 vertices that define that face of the cube.
Exercise #2
Modify the SpinningCube program and this time call it Spinning6ColorCubeQuad.
Your new program will add a "Change Colors" button that, when pressed, will change all the colors on the cube to a new set of six colors. In addition to this your new program WILL NOT use the gl.ELEMENT_ARRAY_BUFFER type.
The incomplete HTML code for your program is given here: SpinningCube.html.
The partial Javascript code is given here: SpinningCube.js.
Your new program will use a simple looping algorithm to make sure that all of the points get arranged in such a way so that they are matched with a set of solid colors for each face of the cube. The following two functions implement this algorithm by identifying the indices for each cube face's vertices in the makeCube() function, and then arranging the points for those indices into two triangles (of 3 points each) with a solid color (chosen by a color index) that will be matched to all 6 of the points for the two triangles:
function makeCube() {
    quad(1, 0, 3, 2);
    quad(2, 3, 7, 6);
    quad(3, 0, 4, 7);
    quad(5, 1, 2, 6);
    quad(4, 5, 6, 7);
    quad(5, 4, 0, 1);
}

function quad(a, b, c, d) {
   var indices = [ a, b, c, a, c, d ];
   for ( var i = 0; i < indices.length; ++i ) {
      points.push(vertices[indices[i]]);

      // for solid colored faces
      colors.push(vertexColors[c]);
   }
}
Add the above two functions into your code above your render() function, and then inside of your render() function replace your "gl.drawElements(...);" line with the following line:
gl.drawArrays(gl.TRIANGLES, 0, points.length);
Note that the reason you can replace this line is because the above functions now do the work of arranging the vertex indices into an actual set of points in the vertex buffer that gets passed to the vertex shader. So you no longer need an index array buffer to do that for you.
This rest of the modifications you need to make to your code are as follows:
- Be sure to change the names of your files to "Spinning6ColorCubeQuad.html" and "Spinning6ColorCubeQuad.js", and then making sure Spinning6ColorCubeQuad.html loads Spinning6ColorCubeQuad.js on the 60th line of the html file.
- Next, in your "Spinning6ColorCubeQuad.js" file change the following lines that determine the order of the colors in the vertexColors array:
var vertexColors = [
    vec4(0.0, 0.0, 0.0, 1.0),  // black
    vec4(1.0, 0.0, 0.0, 1.0),  // red
    vec4(1.0, 1.0, 0.0, 1.0),  // yellow
    vec4(0.0, 1.0, 0.0, 1.0),  // green
    vec4(0.0, 0.0, 1.0, 1.0),  // blue
    vec4(1.0, 0.0, 1.0, 1.0),  // magenta
    vec4(1.0, 1.0, 1.0, 1.0),  // white
    vec4(0.0, 1.0, 1.0, 1.0)   // cyan
];
Replace the above line with the following lines that reorder the colors so none of the six sides of the cube will be black or white (you will see why this is the case later):
var vertexColors = [
    vec4( 0.0, 1.0, 1.0, 1.0 ),  // cyan
    vec4( 0.0, 0.0, 0.0, 1.0 ),  // black
    vec4( 1.0, 0.0, 0.0, 1.0 ),  // red
    vec4( 1.0, 1.0, 0.0, 1.0 ),  // yellow
    vec4( 0.0, 1.0, 0.0, 1.0 ),  // green
    vec4( 1.0, 1.0, 1.0, 1.0 ),  // white
    vec4( 0.0, 0.0, 1.0, 1.0 ),  // blue
    vec4( 1.0, 0.0, 1.0, 1.0 )   // magenta
];
- Below the above lines, add the following two new declaration lines:
var points = [];
var colors = [];
- Next, remove the following lines that we will no longer be using in the global declarations:
// indices of the 12 triangles that compise the cube

var indices = [
    1, 0, 3,
    3, 2, 1,
    2, 3, 7,
    7, 6, 2,
    3, 0, 4,
    4, 7, 3,
    6, 2, 1,
    1, 5, 6,
    4, 5, 6,
    6, 7, 4,
    5, 4, 0,
    0, 1, 5
];
- Next, remove the following lines that we will no longer be using in the init() function:
    // array element buffer for vertex indices

    var iBuffer = gl.createBuffer();
    gl.bindBuffer(gl.ELEMENT_ARRAY_BUFFER, iBuffer);
    gl.bufferData(gl.ELEMENT_ARRAY_BUFFER, new Uint8Array(indices), gl.STATIC_DRAW);
- Next, create a vBuffer object, initialize it, and associate it with the associated vPosition attribute variable in the vertex shader. And be sure to use "points" instead of "vertices" for your bufferData storage, which means your third line should be:
gl.bufferData(gl.ARRAY_BUFFER, flatten(points), gl.STATIC_DRAW);
- cBuffer object, initialize it, and associate it with the associated vColor attribute variable in the vertex shader. Note that the vertexColors are vec4 values instead of vec3 values. And be sure to use "colors" instead of "vertexColors" for your bufferData storage, which means your third line should be:
gl.bufferData(gl.ARRAY_BUFFER, flatten(colors), gl.STATIC_DRAW);
- Set up the thetaLoc uniform location object, associating it with the theta value. Note: the "theta" variable is a vec3 value so use gl.uniform3fv(...).
- Create your three button handlers that determine which of the three theta values is the current one being rotated.
- Add the following call to your init() function right below the "gl.useProgram(program);" line in your init() function:
makeCube();
After that, your program should run and you should see the solid colors.
- Now it is time to add your fourth "Change Colors" button that causes all 6 color faces on the cube to change to a different set of six colors. When this button is clicked a second time the cube will go back to the original set of 6 colors. And it will flip from one color set to the other each time it is clicked.
To accomplish this you will need to create some state variable that flips back and forth from true to false. Call it something like "firstColors" and set it to true as a global variable with the line "var firstColors = true;" somewhere at the top with the other global variables.
- Next, create a second vertexColors array called "vertexColors2" and for each color in your first array, change its corresponding color in the second array. For instance, where you have red as vec4(1.0,0.0,0.0,1.0) make it something else instead like vec4(0.4,0.2,0.2,1.0), or any other value you want, but be sure to keep all RGB values between 0.0 and 1.0, and the last value must always be 1.0.
- Next, create your button in the HTML code (if you haven't done this already) and in your JavaScript code add the button handler. Your button handler change the state of your firstColors variable with the line, "firstcolors = !firstcolors;" followed by the following lines:
            points = [];
            colors = [];
            makeCube();
            gl.bindBuffer(gl.ARRAY_BUFFER, cBuffer);
            gl.bufferData(gl.ARRAY_BUFFER, flatten(colors), gl.STATIC_DRAW);
Note that for the above statements to work, your "cBuffer" variable must be made into a global variable.
- Next go into your quad() function and find the line "colors.push(vertexColors[c]);", and replace that line with the following if-statement:
      if (firstColors) {
         colors.push(vertexColors[c]);
      } else {
         colors.push(vertexColors2[c]);
      }
- Now you should be all done, and your program should work as specified.
Add a Comment block section to the top of your Javascript program in this assignment with the following information filled in using the following format:
/*
 * Course: CS 4722
 * Section: .....
 * Name: ......
 * Professor: ......
 * Assignment #: ......
 */
Be sure your program
runs without error.
DeliverablesTurn in the files: Spinning6ColorCube.zip (with your HTML and JS files)Spinning6ColorCubeQuad.zip (with your HTML and JS files)
Do this by uploading the file as an attachment to this Module's assignment drop box in D2L Brightspace.
|